We’ve just reviewed (and very much condensed) our Social Media Principles for the service.
Have a read of them and let us know what you think!
We’ve just reviewed (and very much condensed) our Social Media Principles for the service.
Have a read of them and let us know what you think!
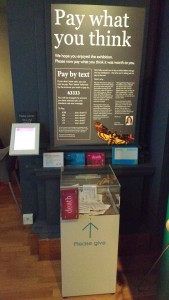
In 2013 Bristol Museum & Art Gallery (BMAG) ran its first Pay What You Think pricing model at the temporary exhibition; Taylor Wessing: Photographic Portrait Prize. The principle is very simple – visitors enter the exhibition for free and pay the amount they feel the exhibition was worth by putting money in a box at the end of their visit. It was a success and visitors responded well to it. But, there was one sticking point; because we were only accepting cash payments our visitors were telling us that they were either not paying or paying less because they didn’t have cash on them.
“A quality experience, thank you M Shed for providing it! Ps. I only have a little cash with me, but would like to have paid £5…”
“Some of the portraits were very moving… P.s. I gave less than £5 – all the cash I had.”
This got us thinking about alternative ways of collecting payments from visitors for our next Pay What You Think temporary exhibition – death: the human experience (24 October 2015—13 March 2016). Card payments were deemed unfeasible as the Pay What You Think system is not staffed in the same way as standard ticketing – so card payments cannot be taken securely. The next thing that came to mind was payment by text message. Taking payment by text is relatively common nowadays – it can often be seen in things like charity appeals and car parks. Anyone who has used a text to pay system before will know that it is a very simple way of making a payment as it generally doesn’t require sign-up or registration. Instead, the user simply sends a text message containing a specific word to a specific number and a set amount of money is paid (I’ll explain in more detail below).
With a month to go before the opening of death: the human experience at BMAG I set about to organise a text to pay system for the exhibition. Here I run through a step-by-step guide to text to pay. Nb. there’s a bit of a catch at the end with collecting payments – the phone companies (3, EE, Vodafone etc.) will probably want to take a slice of your earnings…
The very first steps in setting up the text to pay were trickier than I expected. This is because I didn’t know the proper name for ‘text to pay’. Naturally, I went to google and searched for ‘text to pay provider’ (+ various versions of those words). I found a few websites, but it wasn’t immediately obvious which service I was looking for and who could provide it. I called a couple of companies who offered similar texting services but not exactly what I was looking for. Eventually, I learnt that what I wanted was called a ‘Premium SMS’ service provider. You will have much more luck searching for Premium SMS than ‘text to pay’.
So, once I had found this out I found a couple of companies that provided the s
ervice and requested quotes from them both. I got quotes from the companies Oxygen8 and txtNation (I’m sure there are ![]() many more options out there). The better quote was given by Oxygen8 – so I went with them.
many more options out there). The better quote was given by Oxygen8 – so I went with them.
One of the things that struck me was the amount of regulation and compliance there is involved in Premium SMS. This is actually quite unsurprising as Premiuim SMS is used when you pay for app downloads and in things like TV competitions and voting on programmes like the X Factor. Premium SMS services are regulated by an independent regulatory body called PhonepayPlus – their Code of Practice is regulated by Ofcom.
![]()
Before you can setup and run a Premium SMS service you have to register with PhonepayPlus and ensure compliance with their code of practice. All the information you will need on how to do this can be found here on their website. It is pretty straightforward; it requires some form-filling and a payment of an annual registration fee of £155 +VAT. Once you have done this you will be assigned a PhonePayPlus registration number. Ours is ORG837-51289-03976.
There are two key elements of a Premium SMS system – the Keyword and the Shortcode.
It’s very simple, to make a payment the user sends a prescribed keyword (e.g. PAY5) to a shortcode (a five digit number; e.g. 63333).

The keyword is a word that the user can send in order to make a payment. In the case of our exhibition we have five different keyword options – death1, death2, death3, death5, and death10 – each of which allows for a different level of payment. When a user sends an SMS containing one of these keywords to the shortcode 63333 a payment will be made to the value of the number included in the text; e.g. text death5 and the user will be charged £5. (The payment is either taken from the remaining credit of users with pay as you go phones or it will be added to the bill of users on phone contracts).
The keywords and shortcodes are also the bit that you have to pay your provider (in our case Oxygen8) to setup. There is a charge to setup the shortcode and then a monthly fee for that shortcode – the provider is effectively renting it on your behalf. Then there is a charge to setup each keyword. In total, to setup and run the Premium SMS for the five month duration of the exhibition it cost us approx. £320.
As you might expect there is a bit of compliance to get through when advertising a Premium SMS service. Basically, you have to make it as clear to the user as possible that if they text one of the keywords to the number then they will be charged, and what they are being charged for. Sounds simple, but it took a few emails back and forth with our provider to get this right. The accompanying text also needs to include contact details and your PhonepayPlus registration number. (Your provider should help you with this).
I’m sorry to leave this till last but there is a catch to all of this. If, as we are, you are collecting payments using a Premium SMS service for anything other than a registered charity then the payments you receive from your visitors/customers will be subject to a levy from the phone companies (see here if you’re a charity). In other words, if one of our visitors texts to pay £5 then we will not see the whole £5, the phone company (3, EE, Vodafone etc.) will take a slice of the payment. How much they take depends on the initial value and on the phone company – but typically they take around 25%.
Our visitors to death: the human experience are responding to the text to pay service we’re offering. We know this because we can follow payments on Oxygen’s very handy online dashboard. The individual payments reach us as a single payment from our provider at the end of the exhibition (we had the option of monthly payments).
The Premium SMS service has one final advantage – you gain access to the mobile phone contact details of your visitors. Bristol museum will not be doing any kind of follow-up messaging using our text to pay user details – this is explained to visitors in the advertising material. Other organisations may choose to use mobile phone contact details as part of their marketing.
To some extent, the Premium SMS service we’re running for death is a bit of an experiment both to make our exhibitions as user-friendly as possible and to explore different options for income generation. It’s difficult to judge the success until the exhibition has finished – but we already thinking about using Premium SMS for our one-off events and talks.
If you have any questions or comments and would like to get in touch with me directly, my email is – darren.roberts@bristol.gov.uk
One of the focus areas for improvement at Bristol Museum & Art Gallery (BMAG) and M Shed is our retail offer. Over the past year Zak Mensah (Head of Transformation) and Helen Lewis (Retail Manager), with input from Peter Holloway (retail consultant) and myself (User Researcher), have implemented a number of big and small changes in order increase income generation in our shops but to also make them more appealing, relevant, and exciting parts of the museums.
This post is about a small but seemingly effective change we have recently made within the shop at BMAG. It follows the Phase One refurbishment of the shop in October 2015. The shop refurb included the purchase of seven new nesting tables; one of which we have designated to display products outside the entrance of the shop. Here I look at what impact this small change has had.

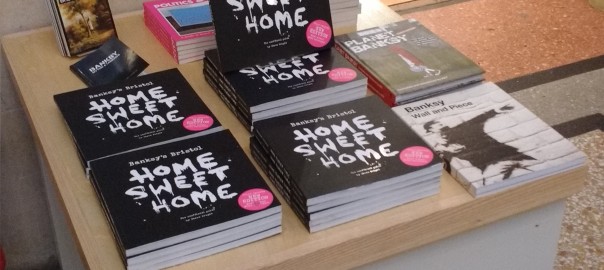
We began using the shop-front display table on the 11th December 2015, and we have been surprised with the positive impact it has had on sales. The display is dedicated entirely to a range of books about Banksy – the world renowned Bristol-born graffiti artist. We know from sales data that the Banksy books are an important product within the BMAG shop. To date in 2015-16 the book Banksy’s Bristol: Home Sweet Home by Steve Wright is our fourth most popular product, and overall it is the most popular book that we sell. If you’re interested, it is now also available through our online shop.
Following the general retail rule of putting the most popular items forefront and centre of the shop, Helen displayed the Banksy books on the shop-front display table. In total we stock four books dedicated to the work of Banksy:
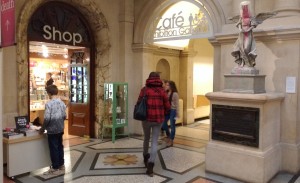
It wasn’t until the table was in place that we realised how much of a natural fit the Banksy book display was. Directly outside the shop is BMAG’s very own piece of original artwork by Banksy – Paint Pot Angel. The iconic piece was given to the museum by Banksy following the hugely successful exhibition/takeover of Banksy’s artwork in the museum in 2009 – Banksy versus Bristol Museum. The display table is in the eye-line of the Paint Pot Angel and it’s the perfect moment to capture visitor’s interest in Banksy, and ultimately to generate sales of Banksy related products.
Between 2nd May 2015 and the 30th December 2015 we have sold a total of 205 Banksy books at BMAG. (Our retail sales records for this year excludes April, it begins in May 2015 as this is when we moved to Shopify).
Period One – without shop-front display table
Period Two– with shop-front display table
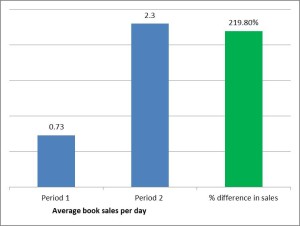 he period we have displayed the Banksy books on the shop-front table, there has been an increase in sales of 219.8%
To some extent these figures may be inflated by the Christmas sales, but there are other notably busy periods within the period between May and December so it is likely that this increase in sales cannot be attributed to Christmas alone.
The lessons of this small change it seems is that it can be good to experiment with change in museum retail, especially if you use the available evidence you have to inform those changes. The Banksy books are also a great example of the need to provide visitors with products that are relevant to their experience of the museum – they respond well to them.

On a regular basis I will see visitors come into the museum, go straight to Banksy’s Paint Pot Angel, take a photo of it and leave. There are only nine pieces of Banksy’s artwork remaining in Bristol, two of which are displayed in our collections – the Paint Pot Angel at BMAG and the Grim Reaper at M Shed. The two that we display are the only ones displayed in-doors and so we have a great opportunity to provide the Banksy books and other merchandise that fans of Banksy want. As I noted above, we already knew that our Banksy products were popular; even before the shop-front display of the books, the Banksy products were already in our top-ten most popular products. So the big lesson is that when looking to increase income generation it is a good to start with popular items and ask whether they could do better still.
We’re pleased AND relieved to share with you our final report on the Hidden Museum project. The project was 12 months of graft and a partnering up with Aardman Animations and the University of Bristol. We rolled our sleeves up with ibeacons, user research and working in a truly agile and remote manner.
We’ll have app publicly available very shortly and we’d love you to come along and give it a go.
Direct link to Report (PDF)
We’ve just passed our 100 day mark since the introduction of Shopify till system in our retail shops. In case you don’t intend on reading the whole post, i’ll tell you now that we’re still using Shopify and i think it’s safe to say it is a success.
In this post I want to cover us going live, what features we use at the moment and what our next steps are.
Our previous system was never properly setup and as a team we didn’t take advantage of its potential. I could of stuck with it but I saw this as an opportunity to explore using the latest shopping cart technology from the web. I’m a big fan of popular tools that I’ve seen ‘scale’ regardless of the sector. I had heard about lots of arts/museum sector specific approaches which quite frankly scare me. As a sector we aren’t really all that ‘special’ when it comes to doing normal things like running a shop. So instead of looking at any of these potentially risky solutions where the market is small and we can get tied to one small supplier I just went straight to looking at what local shops and market stalls were using as i’m treating our retail as a small business so what better place to look. All of these were using web services via tablet or phone. Having attended a Shopify workshop back in June 2014 run by Keir Whitaker I felt that it had what the other systems had to offer so why not use this – no long spec document just a nose for good software and services.
After an initial alpha use of Shopify using the free trial (tip: use the 7 day trial as your alpha test so you have no money to front) I felt happy to use Shopify with the public. Our fallback was to keep the old system plugged in and as we use a separate card reader, we could easily manually take orders with that and a calculator if we really got jammed up.
We decided to launch in early May at Bristol Museum & Art Gallery. We decided to do one shop first and then if all went well we’d do live at M Shed, followed by our tills used by the exhibition team.
As Shopify is pretty user friendly we showed Helen how to add products, how to make a custom sale and how to cash up at the end of the day in less than 20mins. It turns out that Helen had never used an iPad before, let alone Shopify. But within minutes Helen was comfortable enough to plough on with only a little arm twisting from me.
Rather than add 100s of products to the inventory we decided to use the ‘custom sale’ option on the first day and then add any purchased products to the inventory retrospectively. As a word of advice, i think this approach makes the most sense instead of committing many hours to adding products to the Shopify inventory which you may or may not run with. Instead, add as you go.
On the first day I made sure that we had both Zahid and myself available. I spent the first ‘live’ hour down in the shop. Within an hour it was clear that I wasn’t needed. By the day of the first day Helen and Zahid knew way more than I did – in this type of case i’m glad to be made redundant!
After two days Helen asked us to remove the old system as she was very happy with how things were progressing. We have a small retail team of four part-time staff and a small bank of casual staff. Within 2-3 weeks I was getting staff thanking me for introducing the new system. In my previous two years I’ve never had such positive feedback. After the third week we also replaced our M Shed till too. On week six we also used this for our third till which is used to buy tickets for our exhibition (William Hogarth: Painter and Printmaker).
One of the things I love about modern day web services is that they normally offer good documentation and Shopify is no different. This not only helps us to learn about how to best use the service but saves any of us having to write lengthy support documentation. I’ve since used their live online chat a few times when i’ve got stuck and it’s 24/7. A service i’m sure many of the museum POS vendors can only dream of offering. You can ring, live chat, email or use the forums. All of which help staff when none of us digital types are around, which is the way it should be.
I have a great retail team led by Helen Lewis. In theory I just need to know our current financial position. The mobile app lets me see live sales income for the last 90 days. This alone is a leap forward for POS and i get ‘POS envy’ now by all other retail managers whenever I show them. Furthermore I can see what product inventory level is is at anytime and i can scan barcodes to make sales if i really wanted to. I’m currently keeping an eye on our Hogarth mugs, scarfs, a book by Louise Brown and drinks. All new products that I like to track.
To keep the cost down there a number of features which don’t come as standard and reporting is one of them. We have paid for the reporting features which we mostly use for splitting vat/non-vat and exhibition tickets at this point. In the next few months we will really get our head around what reports we want.
We’re very happy so far with our shopify service but there have been a few teething problems worth mentioning.
Our exhibition till has a unique challenge compared to our retail shops. We have over 50 visitor assistants. For each day of the exhibition we may have any one or more of them on the till. This poses a few challenges, mainly around processes and training. Some people had no problems but others really struggled with the idea of an iPad for a till. Nothing too bad. But then it happened. I got a call to say that the exhibition till wasn’t working. I went down and sure enough it was working. False alarm right? Another call 30mins later. This time I could see the problem. Although we could use the Shopify app, the till cash drawer refused to open. Turn it off, turn it back on. Boom. Fixed…. so I thought. This kept happening, time after time. Anyway it turns out that although Shopify will run perfectly happily offline, the cash drawer NEEDS wifi to be triggered to open. A major problem that made lots of visitor assistants quite reluctant to use the till. The problem only occurred on one of the four tills. Zahid tracked down the issue to the router. Apparently there is a known issue with some routers – despite it working fine with the same router elsewhere. Zahid swapped out the router and the problem hasn’t come back. Luckily for us we could use the shop as a fallback till but this wasn’t the best customer service period.
By default there isn’t a feature to include the ‘cost of goods – COGS’ which are essential for knowing the price you paid against the retail price and thus your profit margin. How did I miss that in the alpha! Luckily one of the reasons I chose Shopify was for its adaptability. Shopify has a useful feature to allow them or third parties to make apps for beefing up the default service. One of these, deepmine looks like it has COGS so we’ll be trialling this very soon.
I haven’t found much information about using Shopify POS as it is still quite new. This means that it hasn’t been super fast to find answers to some of our issues. One of the reasons i’m writing this is to increase that information pool. Oh and there is no public roadmap for what’s coming so follow the blog to stay in the loop
Now that we’re comfortable with Shopify we’re starting to turn our attention to the next phase of work.
I’ve had several chats with other museums who spotted by last blog post asking about Shopify. Please do get in touch by phone 0117 922 3571 or zak.mensah@bristol.gov.uk if you want me to help you with anything around our use of Shopify. We’ll also be happy to be paid consultants to set up your service if you need a proper hand.
It is only in the recent history of Bristol Museums, Galleries & Archives that we have been charging an entry fee for some of the temporary exhibitions – the first paid exhibition ‘Eye for Fashion’ took place in early 2012.
In the intervening time a number of approaches to pricing have been tried and tested including, for example, a ‘pay what you think’ model for the Photographic Portrait Prize in 2013. We are currently planning a similar model – ‘Pay what you can’ – for the Death exhibition (24 October 2015—13 March 2016). Over the past few years we have also been collecting data on pricing in the exhibition surveys via questions about ‘value for money’ – responses to which vary according to the exhibition in question. Despite having some data related to pricing, further research on pricing is needed. As such I undertook a short two week exploratory research project looking into temporary exhibition pricing and I discuss some of the findings here.
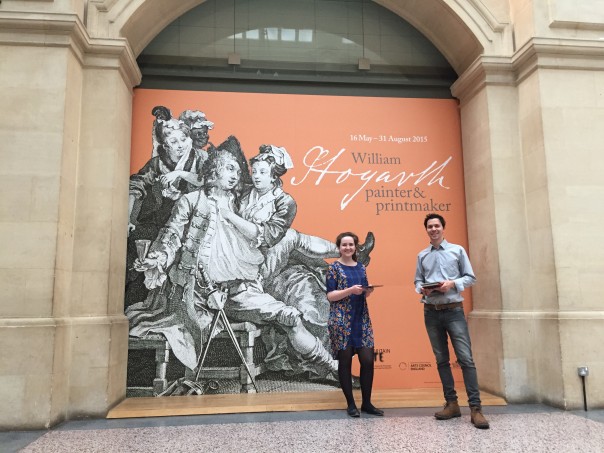
The research involved four days of survey collection whilst the Hogarth exhibition was on in Bristol Museum & Art Gallery (early July 2015). 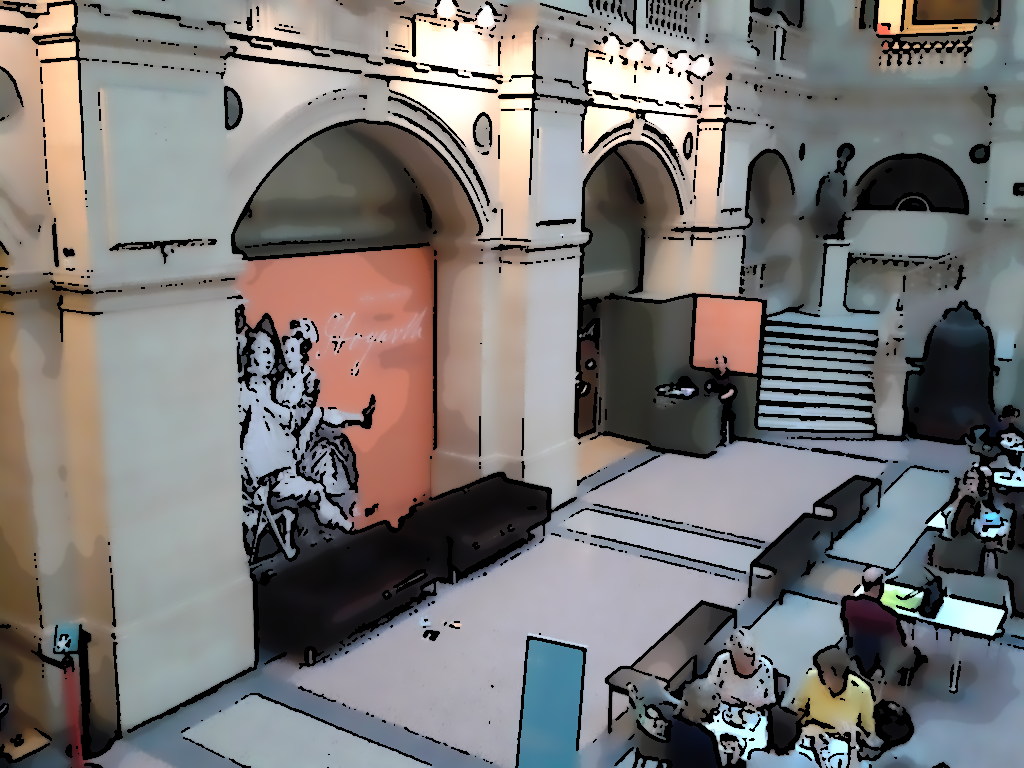 The survey consisted of nine questions focused on the pricing of temporary exhibitions (see below). A total of 39 surveys were completed by a random sample of museum visitors. The key questions to highlight are three and four. These questions ask about firstly the price point of an exhibition that directly appeals to the visitor, and secondly about promotions that would help to incentivise exhibitions which have less direct appeal. The aim is to understand how pricing and promotion relate to different kinds of exhibitions.
In line with the previous visitor feedback on ‘value for money’, the results from the survey suggest that paid entry is not necessarily a barrier to visitors, nor is the current price point of £5. Moreover, the results potentially suggest that a higher price point would not always negatively affect the decision to pay for a temporary exhibition. Below I highlight two key findings and then suggest some further questions that may need addressing with further research.
Finding One
The graph below shows combined data from the Q.1 Have you been to or intend to go to the Hogarth exhibit? and Q.3. ‘Thinking about an exhibition that appeals to you, which statement do you most agree with?’. It shows the following:
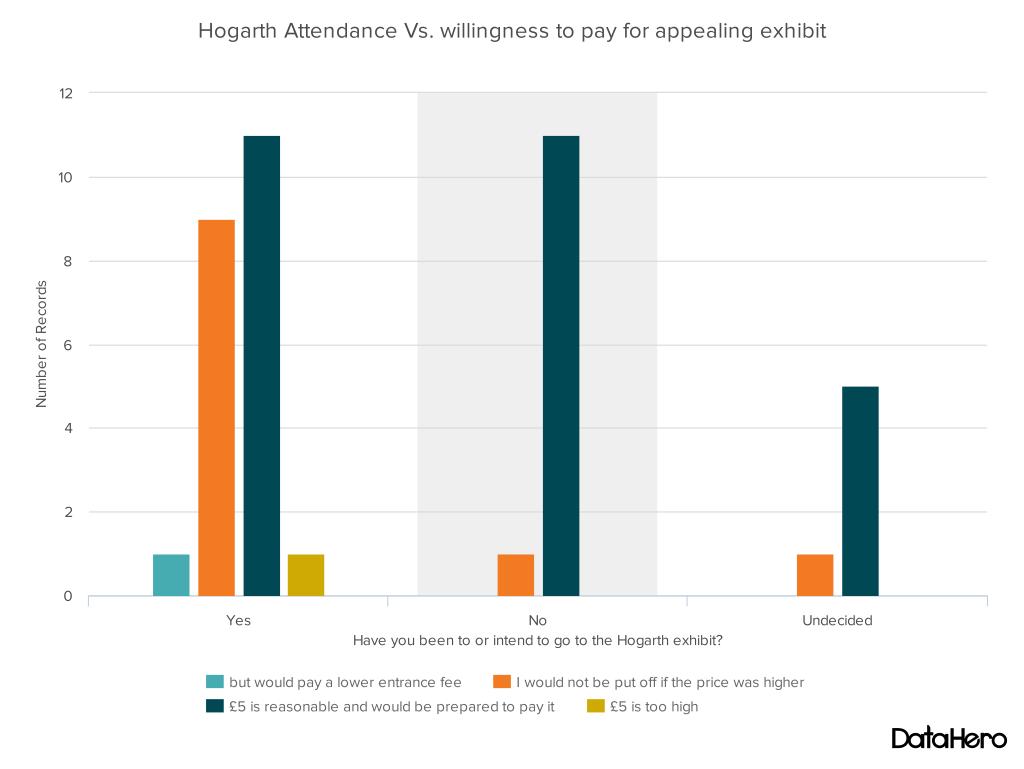
Wider Insight: There may be a need to re-assess the fixed price structure of £5/£4 con/Free U16s across all paid temporary exhibitions in order to maximise the different offers of each one. We know that different exhibitions appeal to different audiences and therefore further research may be needed on how prices points are perceived by key target audiences for each exhibition.
Finding Two
The graph below shows data for Q.4 – ‘If you were unsure about paying to enter an exhibition, would any of the following promotions make you more likely to buy a ticket?’ It shows the following:
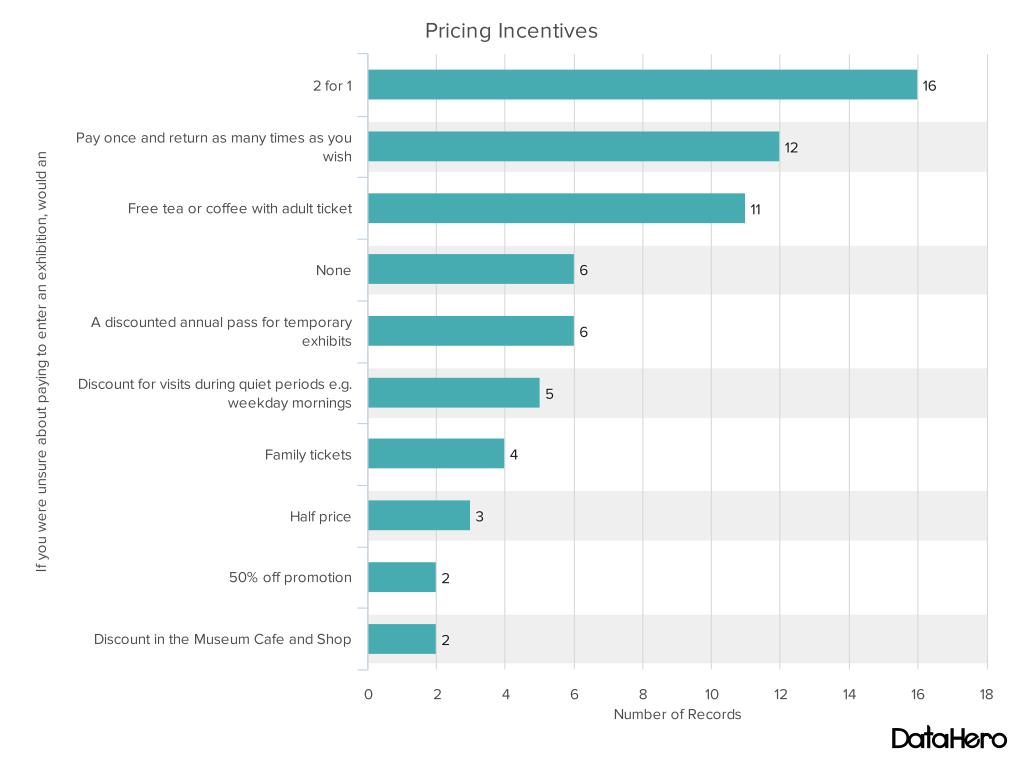
Wider Insight: The data in this graph is indicative of openness among users to re-consider exhibits that they are unsure about given the right pricing incentive or promotion. This needs further investigation, including experimenting with pricing incentives.
Emerging questions and issues
As hoped at the outset of this short piece of research, a number of questions and issues emerged which need further investigation. The first one concerns what place temporary exhibitions have in the overall experience of a museum visit, for example, ‘are visitors using multiple offers in the museum: the permanent exhibitions, the temporary exhibitions (paid and free), the shop, and the café?’ Related to this, there is a need to better understand how temporary exhibitions relate to other paid-for elements in the museum. For example, ‘if the café is currently doing well, should we use its success as a means to increase visitor spend in the shop and in temporary exhibits (i.e. use the café as a direct marketing opportunity)?’
Perhaps the widest reaching insight, which would require further research, is that arguably the primary barrier to entry to any given exhibition remains a perceived lack of interest in a given exhibition. Previous research from the Hidden Museum project, however, revealed that a perceived lack of interest among visitors is often founded on assumptions and bias, but that this can be resolved given the right tools and approach.
Finally, it is part of my task as the new user researcher (audience development) to design and facilitate research which can address these questions and feed the findings back into decisions about how we shape the temporary exhibition offers that we have across Bristol Museums, Galleries & Archives.
If you have any questions about the digital or audience development research we do at Bristol Museums, Galleries & Archives feel free to get in touch with me darren.roberts@bristol.gov.uk
 Hello! My name’s Rachel and I’m a Heritage Lottery Fund Skills for the Future graduate trainee. I am usually based in Worcester as part of the Worcestershire’s Treasures project, with my traineeship focused on audience development and events. As part of the traineeship I’m able to do a week’s secondary placement at another museum or heritage venue, and this week I joined the Bristol Museums digital team to get an insight into what they do, and generally learn some new stuff. I got in touch with Zak and Fay as I knew I wanted to spend my week elsewhere learning more about museums and digital. I had seen both of them speak at conferences – Zak at the Museums Association’s annual conference in Cardiff, and Fay at Culture 24’s Digital Change: Seizing The Opportunity Online in Birmingham – and thought Bristol seemed like the place to be for museums and digital!
I’ve been involved with some really interesting and useful things since the start of the week. On Monday I did some content management on the development site in preparation for user testing later on in the week. On Tuesday I sat in on a meeting with fffunction, and then joined the museum’s new digital marketing intern, Olivia, in creating some content for social media. As the Shaun the Sheep trail started this week, we had fun coming up with some awful sheep-related puns – keep an eye out for these on @bristolmuseum!  On Wednesday I visited The Georgian House Museum and The Red Lodge Museum, conducted some visitor surveys down at M Shed, and then yesterday I sat in on some user testing sessions with teachers, for the new learning pages of the website. They were given a number of scenarios to work through and it was really fascinating to see how users interact with the site and the different ways people navigate through it.
Some of the other useful things I’ve been introduced to this week are the organisation’s Audience Development Strategic Plan and their social media guidelines, and how data collected from users is collated and reported. I also sat in on a meeting with some of the team involved with the upcoming exhibition death: the human experience to discuss the digital engagement to go alongside the physical exhibition and programme. This is just one example of the collaborative nature of the digital offer, and it came across to me that it is viewed as an integrative part of the exhibition, as opposed to just an add-on, which is really positive.
It’s also been great seeing how a different museum works. The museum I work at is quite different, in terms of size, staffing, collection and audience, and so coming to a large local authority museums service with seven physical sites has been a valuable experience in itself.
Overall I have had a brilliant week, I think it’s been a good overview of the team’s work, with lots of variety and things to get involved with. I have felt really welcome and included, and everyone at the museum has been so friendly. Thanks so much to the team for hosting me this week, and especially to Fay for letting me follow her round for most of it. My traineeship comes to an end shortly, so hopefully you’ll see me on a digital team soon!
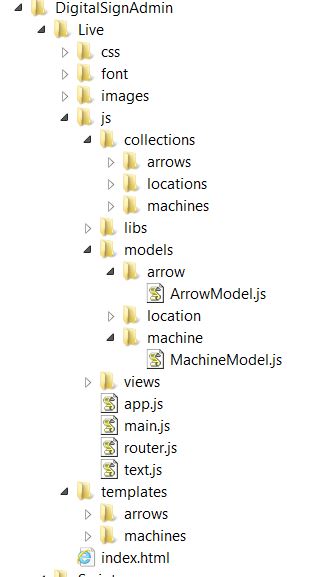
At this stage in the development of our digital signage, we have a working release of the software in the live environment, and we are focussing on training, improvements to the design and data structure for the next version. This post is about the nuts and bolts of how the client-side app works, while it is still fresh.
Firstly, it is a single page web application – loaded upon calling index.html from a web browser. Inside the index.html are just the basics you’d expect. The magic is all controlled via a master JavaScript file called require.js. This library is used to pull together all of the source code in the right order and makes sure files don’t get loaded twice etc. All of the content of the app is loaded and removed via a single content div in the body.
index.html
(... some bits removed...check the GitHub page for the whole lot)


<html>
  <head><title>BMGA Digital Signage</title>
     <link rel="stylesheet" href="css/styles.css">
     <script data-main="js/main" src="js/libs/require/require.js"/>
  </head>
  <body class="nocursor">
   <div id="mainContent" > </div></div>
  </body>
</html>
The first JavaScript to load up is main.JS. This simple file follows theRequireJS format, which is used to alias some of the code libraries which will get used the most such as JQuery.
//main.js

require.config({

 paths:{
     jquery:'libs/jquery/jquery-min',
     underscore:'libs/underscore/underscore-min',
     backbone:'libs/backbone/backbone-min',
     templates: '../templates'
 }
 })

require([

"app"], function(App) {
App.initialize();
});
Next up is main.js. This loads up the code libraries required to start the app, and brings in our first global function – used to close each ‘view’. For a single page app it is really important to destroy any lingering event handlers and other bits which can take up memory and cause the app to go a bit crazy – something that Backbone apps have difficulties with, and otherwise known as Zombie Views. Killing Zombies is important.
//main.js
define([
 'jquery',
 'underscore',
 'backbone',
 'router'

], function($, _, Backbone, Router){
var initialize = function(){


  Backbone.View.prototype.close = function () { //KILL ZOMBIE VIEWS!!!!
      this.undelegateEvents();
      this.$el.empty();
      this.unbind();
  };


   Router.initialize();
 };

 return {
     initialize: initialize
 };
});
It gets a bit more fun next as we call the backbone ‘router’ – and from now on I’ll only add snippets from the files, to see the lot head to GitHub. The router is what drives navigation through each of the modes that the screens can display. Each route takes its parameters from the url and so this means we can control the modes by appending the text ‘sponsors’, ‘posters’ or ‘events’ to the index.html in the browser.
In addition to the mode we can pass in parameters – which poster to display, which page of sponsors, which venue etc. This was a solution to the problem of how to remember which posters have not yet been shown. If you only wish the poster mode to last 40 seconds, but you’ve got lots of posters – you need to remember which posters come next in the sequence. Additionally as you loop through modes, you need to pass along each parameter until you are back on poster mode. This is why every route has all the parameters for venue and poster.
This slightly convoluted situation has arisen as we are using a page refresh to flip between modes and so without relying on local storage our variables are only around as long as the page lasts
//router.js

 var AppRouter = Backbone.Router.extend({
 routes: {
 'sponsors(/venue:venue)(/stick:stick)(/logo:page)(/poster:page)(/machine:machine)': 'sponsors',
 'posters(/venue:venue)(/stick:stick)(/logo:page)(/poster:page)(/machine:machine)': 'posters',
 'events(/venue:venue)(/stick:stick)(/logo:page)(/poster:page)(/machine:machine)(/date:all)':'events',

 }
 });
The code for a single route looks a bit like this and works as follows. We start off with an option to stick or move – this allows us to have a screen stay on a particular mode. Then we look at our settings.JSON file which contains the machine specific settings for all of the signs across each venue. The machine name is the only setting help locally on the system and this is used to let each machine find their node of settings (loop times, etc.).
...
 app_router.on('route:posters', function(venue,stick,logoOffset,posterOffset,machine){


 var stick = stick || "move"
 var logoOffset=logoOffset||0
 var posterOffset=posterOffset||0;

 machineName=machine||'default'
 Allsettings=(JSON.parse(Settings))
 settings=Allsettings.machineName
 settings=('Allsettings',Allsettings[machineName])


 var venue = settings.location;

 if(Globals.curentView){
 Globals.curentView.close()
 }

 var venue = venue || "ALL"
 self.venue=venue

 var posterView = new PosterView({venue:self.venue,stick: stick,logoOffset:logoOffset,posterOffset:posterOffset,machine:machine,settings:settings,type: settings.eventTypes});

 posterView.addPostersFromLocaLFile();
 Globals.curentView=posterView


 }),
....
With all settings loaded, and filtered by machine name and the mode specified – we are ready to load up the view. This contains all of the application logic for a particular mode, brings in the html templates for displaying the content, and performs the data fetches and other database functions needed to display current events/posters…more on that in a bit
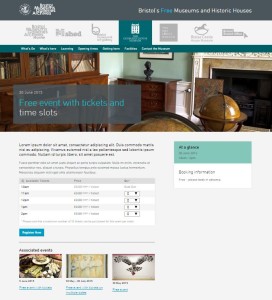
Amongst the code here are some functions used to check which orientation the image supplied is, and then cross reference that with the screen dimensions, and then check if that particular machine is ‘allowed’ to display mismatched content. Some are and some aren’t, it kinda depends. When we push a landscape poster to a portrait screen, we have lots of dead space. A4 looks OK on both but anything squished looks silly. So in the dead space we can display a strapline, which is nice, until there is only a tiny bit of dead space. Oh yep, there is some code to make the font smaller for a bit if there is just enough for a caption..etc. ….turns out poster mode wasn’t that easy after all!
//view.js

define([
 'jquery',
 'underscore',
 'backbone',
 'text!templates/posters/posterFullScreenTemplate_1080x1920.html',
 'text!templates/posters/posterFullScreenTemplate_1920x1080.html',
 'collections/posters/PostersCollection',
 'helpers/Globals',
], function($, _, Backbone, posterFullScreenTemplate ,posterFullScreenTemplateLandscape,PostersCollection,Globals){

 var PosterView = Backbone.View.extend({

 el: $("#eventsList"),

  addPostersFromLocaLFile: function(){

 var self = this;
 self.PostersCollection = new PostersCollection({parse:true})
 self.PostersCollection.fetch({ success : function(data){
 self.PostersCollection.reset(data.models[0].get('posters'))
 self.PostersCollection=(self.PostersCollection.byEventType(self.settings.eventTypes));
 self.PostersCollection=(self.PostersCollection.venueFilter(self.venue));
 self.renderPosters(self.PostersCollection)

 $( document ).ready(function() {

 setInterval(function(){

 self.renderPosters(self.PostersCollection)
 if(self.stick=="move"){
 setTimeout(function() {
 self.goToNextView(self.posterOffset)
 }, settings.posterMode_time * 1000);
 }
 }, settings.posterLoop_time * 1000);
 })

 }, dataType: "json" });

 },

 renderPosters: function (response) {

 if( self.posterOffset>= response.models.length){self.posterOffset=0}

 var width = (response.models[self.posterOffset].get('width'))
 var height = (response.models[self.posterOffset].get('height'))
 LANDSCAPE=(parseInt(width)>=parseInt(height))
 ImageProportion = width/height

 if(LANDSCAPE==true){break;}
 self.posterOffset++
 }
 }

 if(self.orientationSpecific==2){

 //enforced orientation lock
 while(LANDSCAPE==false ){

 if( self.posterOffset>= response.models.length){self.posterOffset=0}

 var width = (response.models[self.posterOffset].get('width'))
 var height = (response.models[self.posterOffset].get('height'))
 LANDSCAPE=(parseInt(width)>=parseInt(height))
 if(LANDSCAPE==true){break;}
 self.posterOffset++
 }
 }

 ImageProportion = width/height
 if(ImageProportion<=0.7){miniFont='miniFont'}
 if(ImageProportion<=0.6){miniFont='microFont'}
 if(ImageProportion<=0.5){miniFont='hideFont'}
 if(ImageProportion>=1.4){miniFont='hideFont'}
 console.log('ImageProportion'+ImageProportion)
 self.$el.html(self.PostertemplateLandscape({poster: response.models[self.posterOffset],displayCaption:displayCaption,miniFont:miniFont},offset=self.posterOffset,TemplateVarialbes=Globals.Globals));


 ....


return PosterView;

});
Referenced by the view is the file which acts as a database would do, called the collection, and there is a collection for each data type. The poster collection looks like this, and its main function is to point at a data source, in this case a local file, and then to allow us to perform operations on that data. We want to be able to filter on venue, and also on event type -(each machine can be set to filter on different event types) and so below you see the functions which do this… and they cater for various misspellings of our venues just in case 🙂
//postercollection.js

define([
 'underscore',
 'backbone',
 'models/poster/posterModel'
], function(_, Backbone, SponsorModel){

 var PosterCollection = Backbone.Collection.extend({

 sort_key: 'startTime', // default sort key


 url : function() {
 var EventsAPI = 'data/posters.JSON';
 return EventsAPI
 },

 byEventType: function(typex) {
 typex=typex.toUpperCase()
 filteredx = this.filter(function(box) {

 var venuetoTest = box.get("type")

 if( box.get("type")){
 venuetoTest = (box.get("type").toUpperCase())}


 return typex.indexOf(venuetoTest) !== -1;
 });
 return new PosterCollection(filteredx);
 },


 venueFilter: function(venue) {

 if(venue.toUpperCase()=="M SHED"){venue = "M SHED"}
 if(venue.toUpperCase()=="BMAG"){venue = "BRISTOL MUSEUM AND ART GALLERY"}
 if(venue.toUpperCase()=="MSHED"){venue = "M SHED"}
 filteredx = this.filter(function(box) {
 var venuetoTest = box.get("venue")

 if( box.get("venue")){
 venuetoTest = (box.get("venue").toUpperCase())}

 return venuetoTest==venue ||box.get("venue")==null
 });
 return new PosterCollection(filteredx);

 },

 parse : function(data) {
 return data
 }


 });

 return PosterCollection;

});
Referenced by the collection is the model – this is where we define the data that each poster record will need. One thing to watch here is that the field names match exactly those in the data source. When backbone loads in data from a JSON file or API, it looks for these field names in the source data and loads up the records accordingly (models in backbone speak) . So once the source data is read, we populate our poster collection with models, each model contains the data for a single poster etc.
//postermodel.js


 define([
 'underscore',
 'backbone'
], function(_, Backbone) {

 PosterModel = Backbone.Model.extend({

 defaults: {

 category: 'exhibition',
 irn: '123456' ,
 startDate: '01/01/2015' ,
 endDate: '01/01/2015' ,
 venue: 'MSHED' ,
 caption: 'caption' ,
 strapline: 'strapline' ,
 copyright: '© Bristol Museums Galleries and Archives'


 },
 initialize: function(){
 //alert("Welcome to this world");
 },
 adopt: function( newChildsName ){
 // this.set({ child: newChildsName });
 }
 })

 return PosterModel;

});
With the collection loaded with data, and all the necessary venue and event filters applied, it is time to present the content – this is where the templates come in. A template is an html file, with a difference. The poster template contains the markup and styling needed to fill the screen, and uses the underscore library to insert and images into the design.
/*posterFullScreenTemplate_1080x1920.html */

<style>

body{
    background-color:black;
    color: #BDBDBD;
}

#caption{
    position: relative;
    margin-top: 40px;
    width:100%;
   z-index:1;
  /*padding-left: 20px;*/
}

.captionText{
    font-weight: bold;
    font-size: 51.5px;
    line-height: 65px;
}

.miniFont{
   font-size:35 !important;
   line-height:1 !important;
}

...

</style>


<div id="sponsorCylcer">
 <%
 var imageError= TemplateVarialbes.ImageRedirectURL+ poster.get('irn') + TemplateVarialbes.ImageSizePrefix
 var imageError= TemplateVarialbes.ImageRedirectURL+poster.get('irn') + TemplateVarialbes.ImageSizePrefix
 %>
 <div id="poster_1" class="">
 <img onError="this.onerror=null;this.src='<% print(imageError) %>';" src="images/<%= poster.get('irn') %>.jpg" />
 <div id="imageCaption"> <%= poster.get('caption') %><br> <%= poster.get('copyright') %></div>
 </div>


 <% if (poster.get('type').indexOf("poster") !== -1 && displayCaption==true){ %>
 <div id="datesAndInfo">
 <h1>from <%= poster.get('startDate') %> till <%= poster.get('endDate') %></h1>
 </div>

 <%} else{
 if ( displayCaption==true){

 %>
 <div id="caption">
 <div class="captionText <% if( miniFont!=false){print(miniFont)} %>" > <%= poster.get('strapline').replace(/(?:\r\n|\r|\n)/g, '<br />') %> </div>
 <%} } %>
 </div>
</div>>


 <% if (poster.get('type').indexOf("poster") !== -1 && displayCaption==true){ %>
<div id="datesAndInfo">
<h1>from <%= poster.get('startDate') %> till <%= poster.get('endDate') %></h1>
</div>

<%} else{
if ( displayCaption==true){

%>
<div id="caption">
<div class="captionText <% if( miniFont!=false){print(miniFont)} %>" > <%= poster.get('strapline').replace(/(?:\r\n|\r|\n)/g, '<br />') %> </div>
<%} } %>
Once the template is loaded, the poster displays, and that’s pretty much job done for that particular mode, except that we want posters to be displayed on a loop, and so the view reloads the template every x seconds depending on what has been set for that machine using the digital signage administration panel. A master timer controls how long the poster loop has been running for and moves to the next mode after that time. Additionally a counter keeps a note of the number of posters displayed and passes that number across to the next mode so when poster mode comes back round, the next poster in the sequence is loaded.
Remarks
 Using the require backbone framework for the application has kept things tidy throughout the project and has meant that extending new modes and adding database fields is as hassle free as possible. It is easy to navigate to the exact file to make the changes – which is pretty important once the app gets beyond a certain size. Another good thing is that bugs in one mode don’t break the app, and if there is no content for a mode the app flips to the next without complaining – this is important in the live environment where there are no keyboards in easy reach to ‘OK’ any error messages.
Furthermore the app is robust – we have it running on Ubuntu, Windows 7 [in Chinese], and a Raspberry PI, and it hasn’t crashed so far. Actually if it does its job right, the application architecture won’t get noticed at all (which is why I am writing this blog) – and the content will shine through…. one reason I have avoided any scrolling text or animations so far – posters look great just as they are, filling the screen.
Now that our content editors are getting to grips with the system, we are starting to gather consensus about which modes should be prominent, in which places – after all if you have different modes, not every visitor will see the same content – so it there any point in different modes? Let the testing commence!
Acknowledgements
Thanks to Thomas Davis for the helpful info at backbonetutorials.com and Andrew Henderson for help Killing Zombies.
 We haven’t done an update on website phase two in a while, mainly because we’ve been busy bees behind the scenes with testing and implementing lots of new stuff.
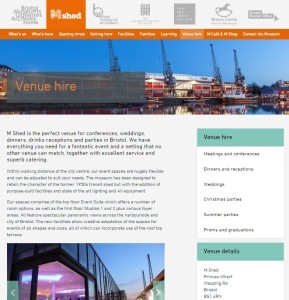
We’re now in the midst of milestone three, having done some work on improvements in milestone one and having held our milestone two workshops a little while back. We recently went live with some fresh new venue hire sections: http://www.bristolmuseums.org.uk/venue-hire/
After workshops and testing we decided to go down the route of event types for venue hire – we have lots of interesting conferences at M Shed, really exciting evening events at Bristol Museum & Art Gallery and lovely weddings at Blaise Castle House Museum so can adapt these depending on what people need and what our offer is. People can find information on room spaces such as capacities, download our menus and contact us to book really easily.
Know anyone who wants to hire a pretty special venue in Bristol? Send ‘em our way!
 Right now we’re in the middle of developing our ticketing functionality, which we’ll be using for our what’s on events (to replace third party sites such as eventbrite) and eventually for learning workshops. For this we’re using WordPress plugin Event Espresso; we’ve been really impressed with how this works and we’re pretty confident it’ll make the user experience so much nicer for people wanting to book with us. There’s a lot of work for us to do on fulfilment (we need to decide what to put on confirmation emails and tickets), setting up a new database and making sure people can navigate through registration easily.
Next up is user testing with teachers and learning people which will be at the beginning of July. We need to cover a number of things for learning: showing our offer (school workshops, gallery visits, teacher training etc), giving users the right information to be able to plan their visit (such as risk assessments) and then being able to book and take payments, so we’ll be testing all of this.
 We’re aiming for learning sections to be in place before the new school year and what’s on updates to be in place before our next What’s On guide comes out in September.
BACKGROUND
We recently launched a system for service-wide digital signage across multiple devices, operating systems, screen sizes and screen orientations. I developed the solution with flexibility as a priority to allow us to adapt as new situations and requirements arise. In practise, going live was the best form of testing and we continue to tweak the signs based on their position, content and user needs.
If there was a take home message from this process, it is not to underestimate the amount of variables in even the simplest form of display. That’s to say, if the system is to be flexible, then these variables need to be made available to the administrators to tinker with, without the need for them to change the source code. This calls for an administration system specifically designed for the purpose of managing the variables for the digital displays, which I have called the DIGITAL SIGNAGE ADMINISTRATION PANEL
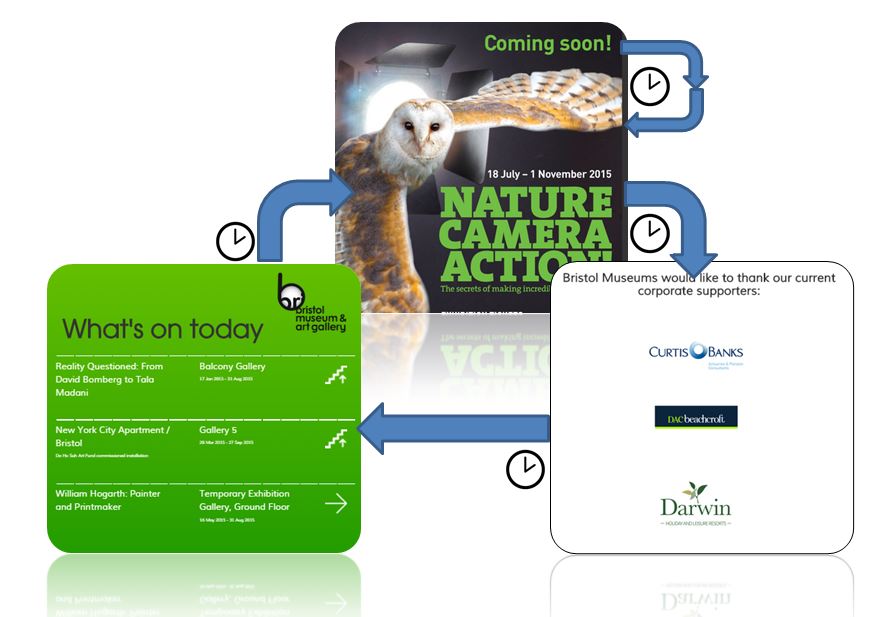
Here’s an overview of the process by which content pushes through to the signs:
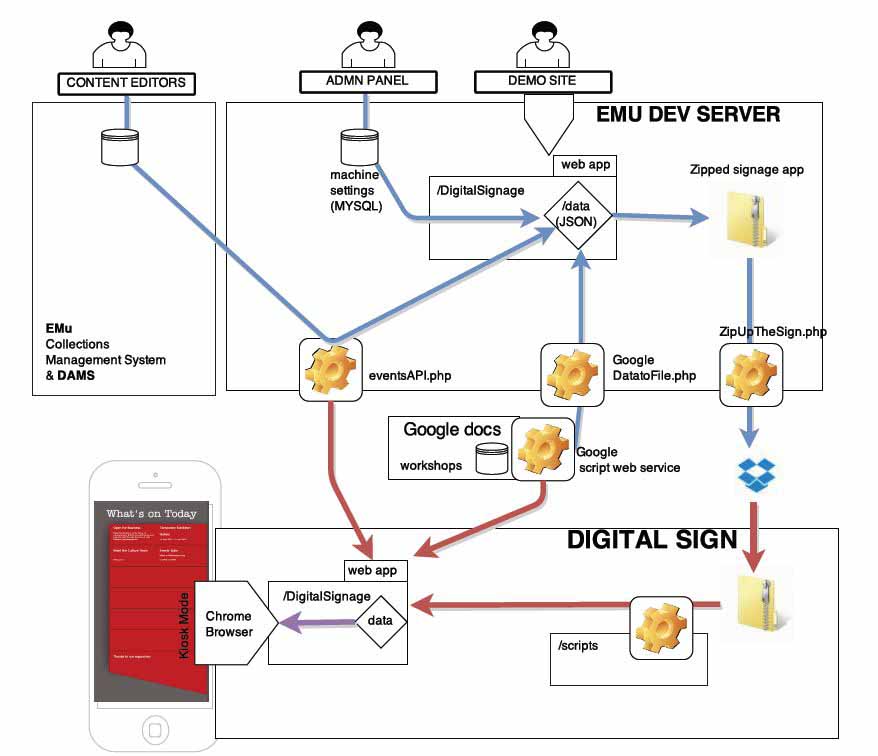
ADMINISTRATION PANEL – INTERFACE
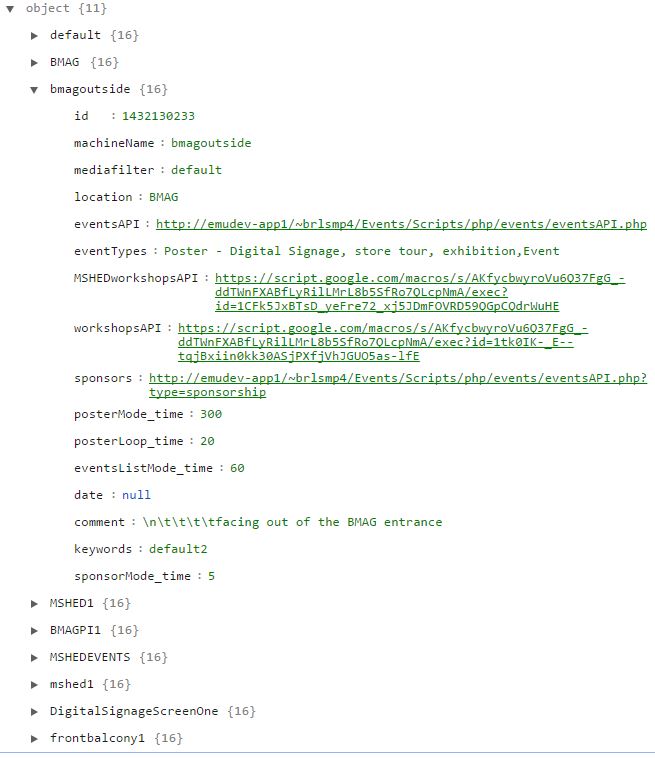
The interface is a basic HTML table displaying a list of each digital sign and the sign specific settings. Each sign is given a name which is used by the client machines to choose settings applicable to them on power up. The location is used to change the overall look and branding of the signs at different buildings. Then follows a series of time settings which control how long each mode is displayed for. The signs flip between sponsor, poster and events list modes. In order to control the sorts of content to display on each sign, for example to restrict one sign to just display exhibition details we use a comma separated list of event types which match those used in the content management system (EMu). To keep a handle on which settings relate to which machine, a comments field allows us to make notes on this – even with just 3 identical machines deployed, it is a useful reminder to know which is which in case we wish them to behave differently in future.
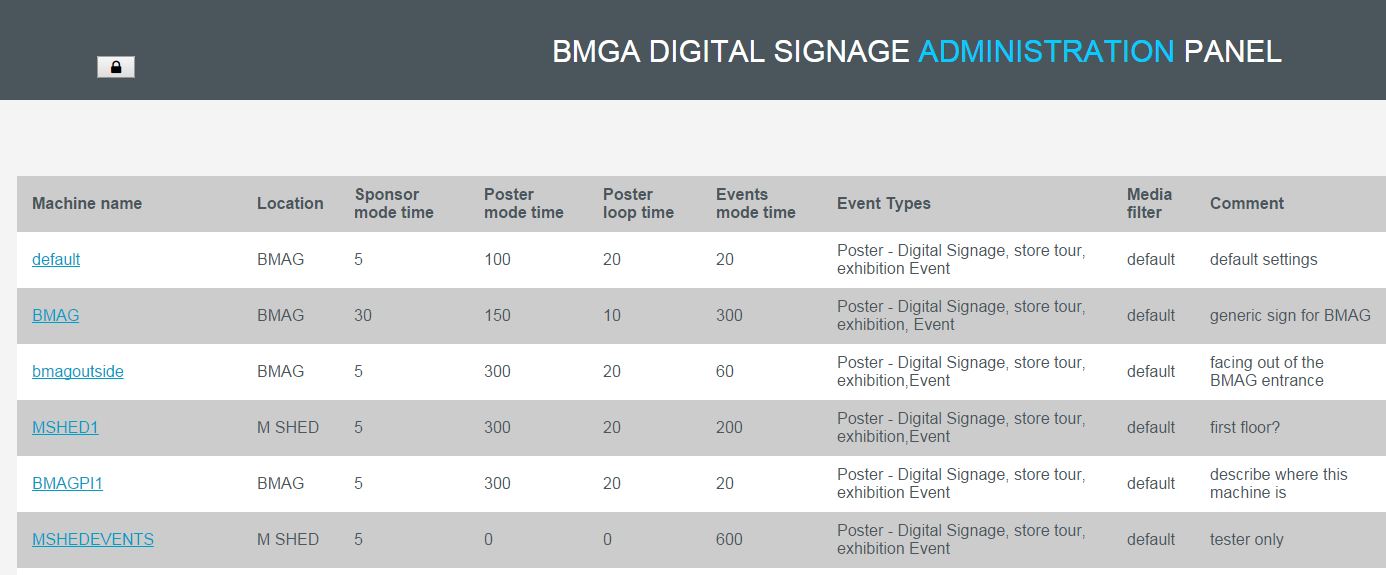 In addition to the settings displayed are some hidden columns which contain further settings, such as the urls of the various APIs used to harvest data, which could one day change. These hidden settings are made available to be edited at the click of a button.
CHANGING AND STORING SETTINGS
To prevent accidental changes being made to the table, users must click the padlock icon and enter a password. Then all data in the table becomes editable, and changes are fed back in real time to be stored on the server. To allow users to see the effects of their changes on the content of each machine, the machine names become links which navigate to a web page which emulates that particular digital sign.
EXPORTING SIGN SETTINGS
As part of the scheduled content update, the sign settings are extracted from MYSQL and saved as a JSON text file. A similar additional file is required to store the arrow settings. As each digital screen knows its name and it can access the settings by matching its machine name with the relevant node in the settings.JSON file.
WAYFINDING ARROW SYSTEM
One of the biggest challenges in the solution was the requirement to build in a system of wayfinding arrows for each event. Not only does each arrow need to be configured for each room location, but each digital sign is in a different location and so the problem is compounded. This called for an entity relation between the event spaces and the digital signs. As we are using MYSQL to store the sign settings, I added a new table in the database specifically to handle the arrows, and because each sign had multiple events, and each event can have multiple arrow directions depending on the sign location, we needed an additional interface to allow us to configure these settings.
To do this I extended the framework used to build the administration panel to include another panel for the arrows:
![]()
A nifty JavaScript plugin (http://designwithpc.com/plugins/ddslick#demo) allowed me to incorporate the wayfinding icons into a dropdown list to make it easy for administrators to change the settings:
![]()
ADMIN PANEL – CLIENT SIDE
The administration panel is built using the Backbone JavaScript framework, and with RequireJS to manage the dependencies. This allows for easy extendibility, for example to incorporate the arrow way finding system.
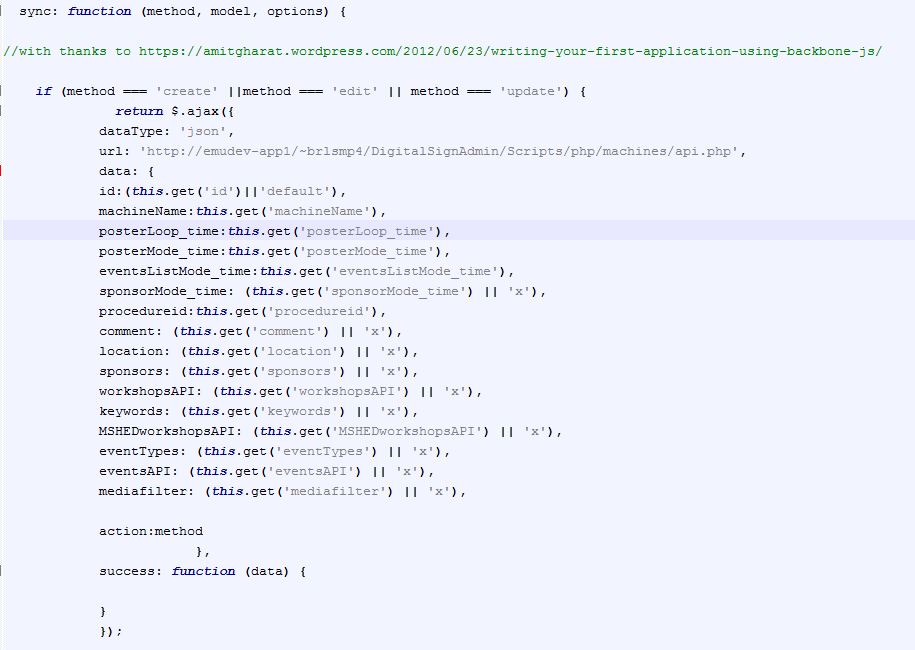
Backbone’s model syncing methods also make it more straightforward to add new settings as new requirements arise and to match these with the database and perform updates:
SERVER SIDE
A PHP script on the server listens out for updates from the admin panel and saves these into MYSQL. The same script returns the new settings in JSON and it is this that is used to refresh the admin panel once changes have been made, and also to make the settings available to the scripts involved in updating the content.
The next steps for this are to include icons for upstairs and downstairs, as I have observed museum visitors reading the up symbol to mean directly ahead when in actual fact it was meant to direct people to the upper level.
NB: as ever, the devil is in the detail and far more logic for this application has been baked into the source code than could be practicably explained here , and so we hope to release the digital signage administration panel on GitHub once this development phase is over.
RESOURCES
http://backbonejs.org/
https://github.com/BristolMuseumsGalleriesandArchives