How to get rid of VGA after 30 years!

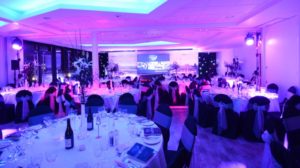
Here at the M Shed in Bristol, we have amazing views of the harbor from our lovely events suit. Here we hold all sorts of events from large annual AGMs for corporations’, to weddings and some really great community events.


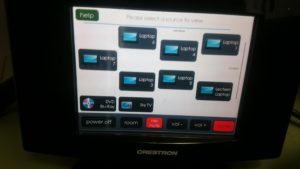
We have a fully automated integrated audio visual system. With AMX and Creston control systems, you can walk around the function rooms holding a smart, touch screen control panel and control just about everything! You can power up the projectors, lower the screens, open and shut the blinds, control volumes, select what to display from Sky TV, Blu-ray players and laptops, you can even change the lighting to any colour scheme you want.


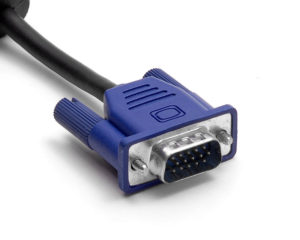
It’s all pretty smart. Pretty smart apart from the dreaded Video Graphics Array as the main interface, more commonly referred to as the VGA connector! For all this advanced technology, presenters still have to connect their devices with a cable.
The VGA standard was invented in 1987 by IBM, and its dreaded 15 pin D Sub connector still to this day refuses to go away.
Until now…

 
There’s something amiss when a presenter asks to use their nice, brand new iPad to run their presentation and you then have to use a lighting port to VGA adapter connected to 10 meter VGA cable. These VGA connectors were designed for permanent installation and so when they are swapped between laptop and other devices several times a day, the 15 tiny pins take a battering and it only takes one bent pin for the screen to go pink, blue or stop all together.

Here comes the ingenious solution to take advantage of the wireless / Wi-Fi capabilities that are now standard for all devices.

The idea and solution comes in the form of finding a combination of ready available, off the shelf technology combined in such a way it allows the transmission of a device’s screen to appear on our projection system, without any wires. We needed this to be augmented into our current system without affecting its current capabilities. It is already a great intergraded AV system, it’s just needs to be brought into the future without losing its ability to use the old VGA system. It may be old but it works so well as a last resort and backup.

Apple products long ago ditched the VGA system in favour of min-display ports or “lighting ports”. A quick trip to any Apple store and an assistant will enthusiastically show how with a flick of the devices, a display can be “thrown” to another screen. It’s called Air Play and is Apple’s secure version of Wi-Fi streaming.

Google, with their ever innovative developments, have developed a technology called Chrome Cast to the same effect, which is also based on Wi-Fi streaming.

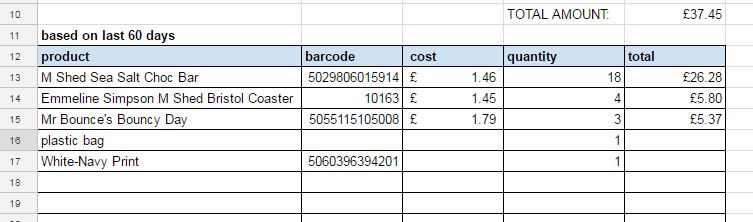
With delegates at our events bringing Apple products, PCs and android devices, we needed an all in one system; so purchased these products to enable this streaming. I ordered an Apple TV and a Chrome Cast device which both work by connecting to a Wi-Fi network and looking for compatible devices. Both of these provide a solution for all devices. Chrome Cast is much cheaper than Apple TV and can support Apple products too, but the ease of use and reliability of Apple on Apple products seemed worth the extra investment. I calculated the cost of replacement VGA cables and at the current rate we replace them, these new items would pay for themselves in just three years!

The main issue I faced in integrating these was how to patch them into a fully automated, closed AV system without affecting its capabilities. In essence, how to “retrofit” an Apple TV and Chrome Cast and get the systems to talk over M Shed’s Wi-Fi – a public network, effectively part of the councils IT network and heavily locked down.
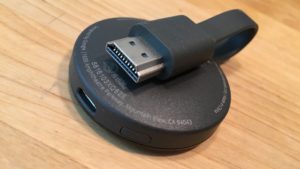
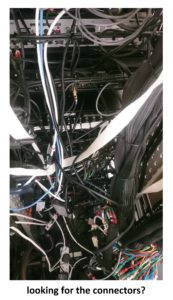
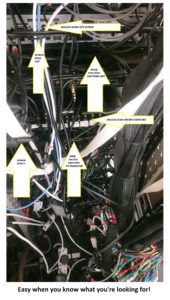
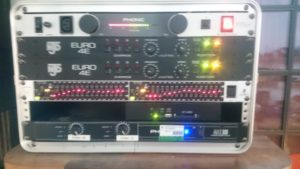
To solve the first issue, I had to literally climb into the AV racking system to find a suitable part that interfaced with an HDMI connector (both Chrome Cast and Apple TV use HDMI). I chose our SKY TV box and unplugged its HDMI cable. Onto this cable I place a HDMI switcher, which allows 4 inputs to connect as one. The switcher is the sort of device you would buy if your TV at home only has one HDMI port and you had multiple devices you wanted to connect: a DVD player, games console and a Freeview box. I then connected the Sky box to the switcher along with the Apple TV and Chrome Cast unit. Then after finding power outlets, whilst still inside the AV systems rack, I carefully slid the switcher unit so its control switch faced out the front of the rack. A few cables ties and some Velcro later and the hardware was installed, all that was left to do was to climb out and check it all worked.

Going back to the Creston AV touch panel, I selected Sky TV and sure enough it appeared on the projections screen as it should. Then by using the controls on the switcher unit I was able to toggle between Sky, Apple TV and Chrome Cast.
It then occurred to me that both the Apple and Chrome devices use the HDMI to output their audio too. However the HDMI feeds to the projector which only projects the image, so audio would be lost. Climbing back into the AV rack, I noticed that the Sky box was using analog RCA connectors to output its audio to integrated ceiling speaker system. Fortunately the switcher also had 3.5mm TRS output (headphone socket), so by setting the Sky box to output audio through its HMDI it meant that all three devices were now feeding the audio and visual signal to the switcher. Then by using the RCA connector from the Sky box with the TRS adapter, all three devices were now feeding to the ceiling speaker system. I climbed back out of the rack and started to create a new, independent Wi-Fi network for devices to communicate.


The new Wi-Fi network was actually the simpler part.
I 
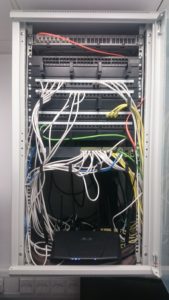
purchased an ASUS RT-AC3200 Tri-Band Giga-Bit Wi-Fi router. This router is enormous with six aerials and looks like the Batmobile. I figured that it would have to be reliable and be able to cope with large amount of data traffic, so I got the most powerful but cost effective router I could find.

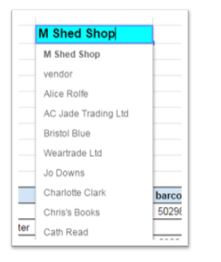
The idea behind the router was to have all the devices (Apple TV, Chrome Cast and whichever device is streaming) all on the same network, a network I could manage. Once on the same network, it was a matter of connecting. The Apple system was really straight forward- you join the same Wi-Fi network as the Apple TV (I named the network “presentations”) then chose the Airplay option on the device and as easy as that the screen is mirrored on the projector. The Chrome set up was a little more involved. With an android device, you have to install an app called Chrome Cast. Once installed it’s quite straight forward to pair with the Chrome Cast receiver and then the screen can be mirrored on the projector. With a Windows PC laptop, I had to install the latest version of Chrome. This then comes with the option to cast either just the browser tab you’re using or the whole desktop -this works well but compared to the Apple TV there is a slight lag. In some instances you would have to install the Chrome Cast extension for Chrome.

I also connected the Wi-Fi router to our open Wi-Fi system with a RJ45 cable. This then allowed people on the Presentation Wi-Fi to still be able to access the net.
We are still trialing the system before we start to officially offer it as part of a package, but so far so good. It has been received very positively from users. We’ve had people walking around with iPads – controlling their presentation and not being tied to the lectern with an old pc. We’ve even had the best man at a wedding wirelessly control the music playlist from his iPhone at the top table! PCs are still being used at the lectern as normal but without the need to trail VGA cable everywhere. The only thing left to work out is wireless power… I suppose batteries will have to do for now.

How to make two 120FT cranes talk to each other

Here at M Shed Bristol, we have some great working exhibits from the bygone era of Bristol Harbour’s industrial past: steam engines, steam boats, steam cranes and more. But the most recognisable and iconic are the four great towering electric cranes standing over 120 feet above the old docks.

As the Industrial Museum was being transformed into the present day M Shed Museum two of the cranes would strike up conversations with each other, entertaining and informing passers-by of what they could look forward to seeing inside the new museum. However due to renovations and movement of the
cranes they fell silent again…

A few years later, due to popular demand I was tasked with bringing the cranes back to life!

To get these cranes talking was going to require rebuilding the whole audio and lighting system and recording new scripts. We were fortunate enough to have Alex Rankin, from our M Shed team, lend his penning abilities for the new scripts and Jacqui and Heather to voice the new crane characters.

To record the dialogu
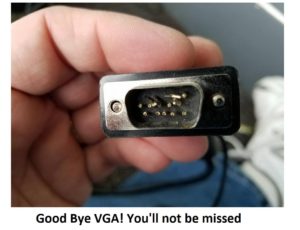
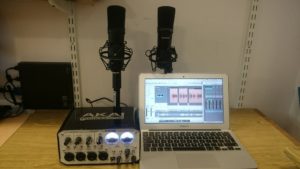
e, we arranged to meet in a nice quite corner of the L Shed store room. It’s a vast store, full of so many objects that there isn’t enough space to have them on permanent display. With both Jacqui and Heather sat at opposite ends of a table, I set up a pair of good quality condenser microphones. Each plugged into their own separate channel on my external sound card, an Akai EIE 4 channel usb sound card with great preamps and phantom powered for the mics. This in turn was hooked up to my MacBook and copy of Logic Pro. I recorded through each script a few times and was able to compile a seamless recording from the various takes. Once finished, I hard panned each channel left and right so that when each voice played back each would have its own speaker, left or right – crane 1 or crane 2.

To start building the new AV system, I searched around the vast L-Shed stores and work rooms to find what was left of the old system. I then decided what could be re used and what new equipment would be needed. I had been informed, by our volunteer team for the working exhibits, that everything had been removed from the cranes themselves; this meant starting from scratch.

The cranes themselves would need a loud speaker system for the voices and the crane cabs would need different coloured lights to flash in time with the talking as this helps to animate the cranes. That part was relatively easy. It meant scaling the cranes and bolting speakers to their underside and mounting lamps inside the cabs. I’ll be honest, I was helped by the Volunteer team and a huge mobile diesel powered cherry picker!


The hard part was how to feed the power and audio cables to the cranes. After some investigation it turned out that below the surface of the dockside was a network of underground pipes which lead to the base of each crane to feed their power. The great volunteer team once again worked miracles and fed over 600 combined meters of audio and lighting cables for me. This all led back to the clean room in their ground floor workshop. With all the cabling done I just needed to build a lighting control and audio playback system.


My design solution, using what kit I could find and a few new bits, was to use a solid state compact flash media player, graphic equaliser, audio mixing desk and power amplifier for the audio.  To have the light flash in time with the dialogue, I used a two light controller with a light to sound module, similar to what a DJ might use to have their disco lights flash to the music!

By having the audio go through the mixing desk, I was able to take an audio feed for each channel and direct them to lighting controllers. By recording the two voices in stereo, with each voice on its own left or right channel, it meant i only needed one media player and could easily control each channel on the sound desk. The graphic equaliser allowed me to tweak the speakers to acoustically fit their environment.

I looked at randomising the audio or having it triggered by people walking past, but with the amount of people who pass outside M Shed the cranes would be chatting away, non-stop all day! I decided to create a long audio file of about 3 hours with the different recorded scripts and random intervals of silence. These ranged from 5 minutes to 20 minutes, so it always comes as a surprise when they start talking to each other.

The results are really effective. It is always fun to see people being caught by surprise as the cranes light up and start a conversation and to see them stop and listen in on what they have to say.


How we did it: automating the retail order forms using Shopify.

*explicit content warning* this post makes reference to APIs.

THE PROBLEM:  Having set ourselves the challenge of improving the buying process  , our task in Team Digital was to figure out where we can do things more efficiently and smartly. Thanks to our implementation of Shopify, we have no shortage of data on sales to help with this, however the process of gathering the required information to place an order of more stock is time consuming – retail staff need to manually copy and paste machine-like product codes, look up supplier details and compile fresh order forms each time, all the while attention is taken away from what really matters, i.e. which products are currently selling, and which are not.

In a nutshell, the problem can be addressed by creating a specific view of our shop data – one that combines the cost of goods, with the inventory quantity (amount of stock left) in a way that factors in a specific period of time and which can be combined with supplier information so we know who to order each top selling product from, without having to look anything up. We were keen to get in to the world of Shopify development and thanks to the handy Shopify developer programme documentation & API help it was fairly painless to get a prototype up and running.

SETTING UP: We first had to understand the difference between public and private apps with Shopify.  A private app lets you hard code it to speak to a specific shop, whereas the public apps need to be able to authenticate on the fly to any shop. With this we felt a private app was the way to go, at least until we know it works!

Following this and armed with the various passwords and keys needed to programmatically interact with our store, the next step was to find a way to develop a query to give us the data we need, and then to automate the process  and present it in a meaningful way. By default Shopify provides its data as JSON, which is nice, if you are a computer.

TECHNICAL DETAILS: We set up a cron job on an AWS virtual machine running Node and MongoDB. Using the MEAN stack framework and some open source libraries to integrate with Google Sheets, and notably to handle asynchronous processes in a tidy way. If you’d like to explore the code – that’s all here. In addition to scheduled tasks we also built an AngularJS web client which allows staff to run reports manually and to change some settings.

Which translates as: In order to process the data automatically, we needed a database and computer setup that would allow us to talk to Shopify and Google Docs, and to run at a set time each day without human intervention.

The way that Shopify works means we couldn’t develop a single query to do the job in one go as you might in SQL (traditional database language). Also, there are limitations in how many times you can query the store. What emerged from our testing was a series of steps, and an algorithm which did multiple data extractions and recombination’s, which I’ll attempt to describe here. P.S. do shout if there is an easier way to do this ;).

STEP 1: Get a list of all products in the store. We’ll need these to know which supplier each product comes from, and the product types might help in further analysis.

STEP 2: Combine results of step one with the cost of goods. This information lives in a separate app and needs to be imported from a csv file. We’ll need this when we come to build our supplier order form.

STEP 3: Get a list of all orders within a certain period. This bit is the crucial factor in understanding what is currently selling. Whilst we do this, we’ll add in the data from the steps above so we can generate a table with all the information we need to make an order.

STEP 4: Count how many sales of each product type have taken place. This converts our list of individual transactions into a list of products with a count of sales. This uses the MongoDB aggregation pipeline and is what turns our raw data into something more meaningful. It looks a bit like this, (just so you know):

STEP 5: Add the data to a Google Sheet. What luck there is some open source code which we can use to hook our Shopify data up to Google. There are a few steps needed in order for the Google sheet to talk to our data – we basically have our server act as a Google user and share editing access with him, or her?. And while we are beginning to personify this system, we are calling it ‘Stockify’, the latest member of Team Digital, however Zak prefers the lofty moniker Dave.

The result is a table of top selling products in the last x number of days, with x being a variable we can control. The whole process takes quite a few minutes, especially if x >60, and this is due to limitations with each integration – you can only add a new line to a Google sheet once / second, and there are over 500 lines. The great thing about our app is that he/she doesn’t mind working at night or early in the morning, and on weekends or at other times when retail managers probably shouldn’t be looking at sales stats, but probably are. With Stockify/Dave scheduled for 7am each morning we know that when staff look at the data to do the ordering it will be an up to date assessment of the last 60 days’ worth of sales.

We now have the following columns in our Google Sheet, some have come directly from their corresponding Shopify table, whereas some have been calculated on the fly to give us a unique view of our data and on we can gain new insights from.

  • product_type: (from the product table)
  • variant_i:d (one product can have many variants)
  • price: (from the product table)
  • cost_of_goods: (imported from a csv)
  • order_cost: (cost_of_goods * amount sold)
  • sales_value: (price * amount sold)
  • name: (from the product table)
  • amount sold: (transaction table compared to product table / time)
  • inventory_quantity: (from the product table)
  • order_status: (if inventory_quantity < amount sold /time)
  • barcode: (from the product table)
  • sku: (from the product table)
  • vendor: (from the product table)
  • date_report_ru:n (so we know if the scheduled task failed)

TEST, ITERATE, REFINE:  For the first few iterations we failed it on some basic sense checking – not enough data was coming through. This turned out to be because we were running queries faster than the Shopify API would supply the data and transactions were missing. We fixed this with some loopy code, and now we are in the process of tweaking the period of time we wish to analyse – too short and we miss some important items, for example if a popular book hasn’t sold in the last x days, this might not be picked up in the sales report. Also – we need to factor in things like half term, Christmas and other festivals such as Chinese New Year, which Stockify/Dave can’t predict. Yet.

AUTOMATIC ORDER FORMS: To help staff compile the order form we used our latest Google-sheet-fu using  a combination of pick lists, named ranges and the query function to lookup all products tagged with a status of “Re-order”

A list of suppliers appears on the order form template:

and then this formula looks up the products for the chosen supplier and populates the order table:

“=QUERY(indirect(“last_60_days”&”!”&”11:685″),”select G where M='”&$B2&”‘ and J=’re-order'”)”

The trick is  for our app to check if the quantity sold in the last x days is less than the inventory quantity, in which case it goes on the order form.

NEXT STEPS: Oh we’re not done yet! with each step into automation we take, another possibility appears on the horizon…here’s some questions we’ll be asking our system in the coming weeks..

  • -How many products have not sold in the last x days?
  • -If the product type is books, can we order more if the inventory quantity goes below a certain threshold?
  • Even if a particular product has not sold in the last 60 days, can we flag this product type anyway so it gets added to our automatic order form?
  • While we are at it, do we need to look up supplier email addresses each time – cant we just have them appear by magic.

…furthermore we need to integrate this data with our CRM…..looks like we will be busy for a while longer.


Retail: Improving the buying process

Customers buy what they can pick from the shop floor or online catalogue. Not what is “on its way from a warehouse” or “gathering dust” on our stockroom shelf. Stock not available to the customer is therefore waste. A waste of committed money (cash flow concern which  immediately introduces risk) and a waste of space in our shop stockroom which in turns reduces overall shop floor space and slows staff looking for product.

Because “Buying” is the most critical of the four pillars of retail, it seems the sensible place to focus our attention on to gain further improvement. I’m going to challenge ourselves to use 2017-18 to maximise our buying by refining the workflow.    This will be a collaboration between me, retail, user research and our digital team.

At present we do our buying like any other retailer, we order by supplier when we feel or notice heavy product depletion. Furthermore at any one time we’re “holding” about 10% of our annual total stockholding in our stockroom and another 10% on the shop floor. If it is on the stockroom shelf it has zero chance of being sold.  In addition to having a costly quantity of product hanging around, the space used to hold our product could potentially be converted into public shop floor space. For example at Bristol Museum and Art Gallery there is a false wall which conceals our stockroom which is about 8m in length with a depth of 1.4m. If we’re about to improve how we buy, it is possible to push this wall back further and gain that space as public floor space that could be used for 2-4 nesting tables worth £10,000+. The challenge of course is that would reduce our total stockroom space by 2/3.

If we can nail our understanding of what to buy and when, this would unlock the potential to carry out operation “shrink the stockroom”. Order exactly what we need when we need it and not before.

The upsides would be:

  •  Move to a new process of ordering “just in time”
  • reduce stockroom size thus freeing up new floor space for customers worth £10,000+
  • reduce “out of stock” scenario by improving the buying process
  • order by need not assumption
  • reduce ordering time across the full year
  • reduce owning costly stock that may not sell which also takes up space
  • maximise available money set aside for buying products that sell
  • Reduce time lost by staff who have to hunt around a big stockroom
  • Heavily reduce human interaction which will reduce our cost per transaction and help us move to being digital by default
  • Allow retail manager to focus on other tasks


Update from the Bristol University development team:

Since October we have been working with Computer Science students from the University of Bristol to redesign the interface for our digital asset management system.

After initially outlining what we want from the new design, there have been frequent meetings and they’ve now reached a stage where they can happily share with us their project so far.
Quick, appealing and easy to use, this potential new interface looks very promising!

Challenge: Improving the buying process for retail

Customers buy what they can pick from the shop floor or online catalogue. Not what is “on its way from a warehouse” or gathering dust on our stockroom shelf. Stock not available to the customer is therefore waste. A waste of committed money (cash flow concerns and thus an introduction of risk) and a waste of space in our shop stockroom which in turns reduces overall shop floor space and slows staff looking for product.

Because “Buying” is the most critical of the four pillars of retail, it seems the sensible place to work on iterating to gain further improvement. I’m going to challenge ourselves to use 2017 to maximise our buying workflow.

At present we do our buying like any other retailer, we order by supplier when we feel or notice heavy product depletion. Furthermore we “hold” about 1/4 of our stockholding in our stockroom. If it is on the stockroom shelf it has zero chance of being sold. In addition to having a costly quantity of product hanging around, the space used to hold our product could potentially be converted into public shop floor space. For example at Bristol Museum and Art Gallery there is a false wall which conceals our stockroom which is about 8m in length with a depth of 1.4m. If we’re about to improve how we buy, it is possible to push this wall back further and gain that space as public floor space that could be used for 2-4 nesting tables worth £10,000+. The challenge of course is that would reduce our total stockroom space by 2/3.

If we can increase our understanding of what to buy and when this would unlock the potential to carry out operation “shrink the stockroom”.

The upsides would be:

  • move to a new process of ordering “just in time”
  • reduce stockroom size thus freeing up new floor space for customers worth £10,000+
  • reduce “out of stock” scenario by improving the buying process
  • order by need not assumption
  • reduce ordering time across the full year
  • reduce owning costly stock that may not sell which also takes up space
  • maximise available money set aside for buying products that sell
  • reduce time lost by staff who have to hunt around a big stockroom

The first major step forward has been moving to a fully digital ordering process to minimise the steps required for that particular part of the system. We use a combination of Shopify reporting and google spreadsheets to do this. Our internal system for generating purchase orders currently prevents us using automated ordering directly to the supplier.

I think the next step will be to understand the rhythm of how often each product is sold AND what minimum order size suppliers can accept.

Myself and the team will write about our successes and challenges throughout the year. It won’t be easy but nothing worth doing is!

The week our office turned into a photography studio!

With one of the main aims this year being to improve our online shop, myself and Darren decided to improve and update some stock photos. We enrolled in a crash course from resident photographer David Emeney and by the end of session thought we’d be able to do it, easy.

However, we came to find that photography is not as easy as it seems! First came the issue of space. Although David kindly allowed us to use his studio in the basement, with no computer nearby to check pictures and in fear of messing with any of his equipment, we though it may be best  if we set up a studio a little more close by.IMG_20170109_154103292_HDR

In true Blue Peter style Darren and I set about creating our own in-office photography studio by collecting bits and pieces from around the museum to mirror the one in the basement. Cardboard tubes were stapled together acting as a rod to hold the white background in place, this was held up by string wrapped multiple times around our window bars, counter tops were cleaned as to not make the paper dirty and even a staff noticeboard was used behind the paper to block out any natural light. Of course our office had to be rearranged first to fit such a project inside, a move which would have me non-stop sneezing for a few days as the settled dust was disturbed!

After a while of playing with the camera’s settings trying to find the right ones, we set to work to photograph stock. With thanks to Debs for letting us borrow geology’s light, the products came out well and the online shop now looks a lot smarter for it. Having this type of light was key to taking a good image, the close proximity between the product and source of light and changing the camera’s white balance when needed added extra quality.

It was a really good experience getting to know the manual settings of a camera and how each product requires a slight adjustment, also to be up to date with what products we currently have in store. I look forward to doing more stock photo shoots in the future and hope, at some point, to have all products photographed like this to keep a consistent look for the online shop.

£70 stoneSSGB edt 4559warrior duck 4857

My Digital Apprenticeship with Bristol Museums

My name is Lacey Trotman and I am currently in the fifth week of my Digital Apprenticeship with Bristol Museums. Having left college this June completing a 2 year A levels course in History, Art History, Sociology and Film Studies, the summer was spent searching for the right role for me. Despite College pushing for students to attend University – and many of my friends doing so, I felt the pressures of study and exams to degree level were not for me at this time. I chose instead to look at apprenticeships as it gave me a chance to put my skills into practical use in a real world setting.

Since starting on October 4th I have already begun to work on various projects broadening my range of skills and understanding: tackling the Discovery Pens, writing ‘How to’ guides, resizing images, composing surveys, working on the online shop, diving into the fast paced world of social media and editing blogs for the Museum website.

My first impression is that it’s an amazing place to work, with many opportunities to
undertake and progress.  It’s also clear to see that there is a lot of work going into such an institution with many more departments behind the scenes than I could possibly have imagined.

I have always loved visiting museums and galleries. As a proud Bristolian I feel Bristol Museums provide some of the best in the country. Growing up, family holidays were full of excurst-michaels-mountsions to castles and places of historical interest. Most recently, we visited St Michael’s Mount in Cornwall. Our seaside cottage faced the historic site making for picturesque views at all times. With Poldark loving parentbarbara-hepworth
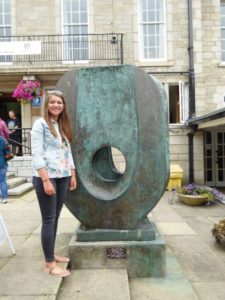
s we also visited the historic mines and ruins of work houses on the Cornish coast. Cornwall was also the home to legendary artist Barbara Hepworth, one of my key artists to feature in the Art History exam I completed this year; so I was thrilled
to see an original piece by her on our day trip to St. Ives.  Even better is that a few weeks after starting this apprenticeship, Winged Figure was newly installed in the gallery confirming this is definitely the best place to work!

Throughout my childhood I visited all the venues that come under the Bristol Museums canopy. My first trip to The Red Lodge Museum, was with Primary School. I remember being asked by the staff if I wanted to dress as Queen Elizabeth I for the class picture, but afraid of the spotlight I volunteered my best friend instead! Blaise Castle was always a childhood favourite of mine and I can also remember visiting the old Industrial Museum with its variety of transport, planes and trucks. However I banksywas delighted when the new M Shed opened offering fun and interactive features for free. I have not yet gotten over missing the iconic Banksy vs Bristol Museum exhibition or Dismaland, just 40 minutes away in Weston. With such strong links to Bristol, Banksy is a favourite artist of mine. Recently he paid my old Primary School a visit leaving a large mural on their classroom wall.

The next two years fill me with excitement and expectation. The addition of a marketing qualification will add further qualifications to my growing C.V.  I hope to excel in my role growing in both confidence and ability; I am keen to ensure I make the most of this experience and hope that all I have to offer will been seen as a positive addition to the hardworking Digital Team.

Our shopify setup for running POS in our gift shops

Across our museums and archive we sell in-person using an iPad and Shopify app. I thought i’d share with you our Shopify point of sale (POS) set up seeing as we’ve now rolled it out to five locations. The setup cost is just under £1000 for the kit and running costs are approx £3000 per year for the Shopify software, reporting and add-ons. It is worth mentioning that originally we used the basic Shopify package which is $29 per month (plus $40 for retail pos) but once we started to get serious with our retail management we upgraded to the “Advanced Shopify” which is approx £2800 per year.

Hardware

We purchased our kit from POS hardware as a bundle for approx £455 (ex vat) excluding the iPad and card reader. Most small merchants skip on getting the receipt printer and prefer to use “email this receipt”.

  • iPad air 2 – £379
  • Bluetooth barcode reader
  • Standard till drawer
  • Receipt printer
  • Contactless Credit/debit card reader with Applepay (approx £20 per month rental)
  • iPad secure stand
  • Router to avoid public wifi and maintain security – fitted by IT services

Software

A good thing about shopify is that you can scale up your options with the click of a button to install new features. Once you pay you can also install it on as many devices as you like which is great for pop-up shops.

Shopify retail $40 per month and is essential for turning your standard shopify account into a retail POS
Advanced Shopify £2800 per year which we use for the “reporting” features
– App – ALT Text FREE used to automatically generate image ALT text for our online shop
– App – Low Stock Alert FREE sends us an email warning which products are running low
– App – Profiteer $15 per month used to add the cost of goods to all products so we can understand our profit
– App – SEO Doctor FREE used to improve our online shop
– App – Shopify Theme Tool which we use for our custom online shop theme

Top tips

Updating shopify or iOS. It normally takes about 45mins to update the app shopify AND update iOS so never do this during hte business day..also avoid Friday or weekends if you have IT support who work Mon-Fri

If possible it is worth having a second iPad in case the primary device falls over for any reason. I’d also suggest you upgrade the software and test it using the second device before unleashing the latest version on the primary device

Shopify has 24/7 support so when I hit a snag I normally use their live chat to help get it resolved

Transformation: Business as Usual

Transformation is made one day at a time. Ideas, mistakes, doing and refining. Ship early, ship often. There are no ribbon cutting moments just the quiet satisfaction that a tool or way things are done become normal and it’s seen as business as usual. I love this transformation.
To counteract my nervous energy on my Dublin to New York City flight I made a brief list of things we’ve introduced in the recent past.
We’ve introduced new roles including Head of Digital and user researchers. New as in never been seen in the service before. How cool is that?! We’ve pushed as many decisions out from management as possible to keep the responsibility with whomever has the direct expertise and to release the bottleneck of waiting for the four of us. Yes we can still override a preferred course of direction.
We’re getting digital tools (basecamp and trello, emu) into position as THE way we do business – freeing up meeting time and being transparent. We’re also chipping away at a culture of being a ‘cultural business’. And that’s just on the staff front. All things to be super proud of from those across the team. What I love though is how “normal” all this is now. Tools like Basecamp were seen as for the nerds like me back in 2014 in the team. Yet in 2016 I can see we now use it for project managing all exhibitions as a matter of course.

We’re cooking on gas using google drive now too as the spreadsheet sharing and linking data gets more critical eg for kpi work. Accurate information over live/ancient information.
The public are seeing some of this work through our ‘Pay What You Think’ approach to our own in-house programme. Tinkering with pricing and value.
Stroll into Bristol Museum & Art Gallery and you’re now greeted upon entry and asked if you’d like to donate without delay.
All of the above are super closely aligned to our core value of “excellence” by focusing on the needs of the user – staff or public. You may be asked on your visit about any number of our services and we use this to make our service better.
Long live business as usual.