Zahid Jaffer, Content Designer
Overview
The Moved by Conflict exhibition at M Shed is comprised of many different types of technology to interpret content, from projectors to speakers. We used some new technology we haven’t used in the past to deliver this content, notably the RFID tag system.
We had several briefs, but the one that stands out is: visitors need to have a personalised experience through the exhibition; the ability for visitors to have content of their choice delivered to them in the exhibition through digital means. The idea was to have stories being told through video, and we worked with Bristol Old Vic to bring a more theatrical performance to these stories. We had actors playing six fictional characters telling their stories, which would capture their lives before, throughout and the end of the First World War.
Concept
We needed a way for visitors to trigger the content when they wanted to experience it. Initially we wanted hidden video screens (projections) around the exhibition and when a visitor walked next to it the video magically appears for them. To do this we looked into iBeacons, a Bluetooth technology which can be used to trigger an activity from a specified distance to the user, for example playing a sound when someone gets within two metres of a loudspeaker. Our concept was when someone gets to within a metre of a screen the content appears and when they leave that area the content turns off. The trigger device would be a visitor’s smartphone or a small Bluetooth transmitter/tag.
After a lot of research we found that this would cost a lot of money and would take a lot of time to develop – this technology is still very new, which is why it costs quite a bit. We looked then at long-range RFID technology, but this was also outside of our budget. We decided to go for short-range RFID, so a visitor would need to pick up an RFID wrist band and scan it in a specific location, as we were still keen on the idea of the content being triggered when you get to a certain distance. To do this we’d need to use a sensor, which wouldn’t trigger the main content but would trigger an intermediate screen, such as an image with instructions on it informing you what to do with the RFID wrist band.
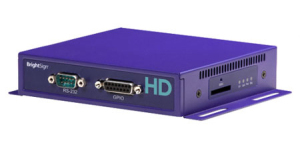
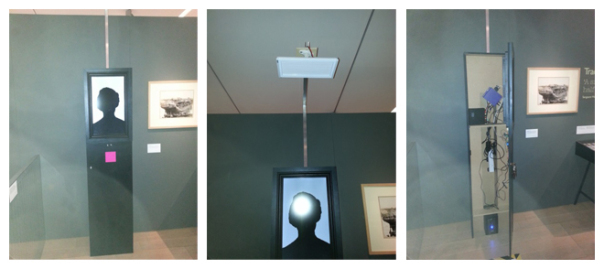
Once we had finalised the concept we started looking into the equipment that would enable us to do what we wanted. We looked at a number of options, ultimately what we went for worked very well. The content is displayed on a 24 inch screen, used in portrait orientation. There is an actor speaking to camera, with their head and shoulders in shot, giving the actor lifelike dimensions. We needed something that would play the content and to be able to accept triggers so we looked in to Raspberry Pi. For what we wanted to do there would be a lot of programming and coding, and we were also not sure if the Raspberry Pi would be instant enough on the triggering as we were informed Raspberry Pi could have a slight delay in triggering hd content. We wanted instant triggering and relatively easy setup/programming as we were limited on time, so we went down the route of a media player.
We selected a Brightsign hd1020 media player which has GPIO and allows you to connect buttons to trigger content, and also has USB input so you can connect a keyboard to it. The programming of this media player is relatively easy to do as it has graphical programming software you load on to your pc. These three elements were what we needed to make our concept work.
Concept to Reality
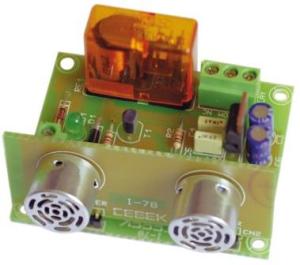
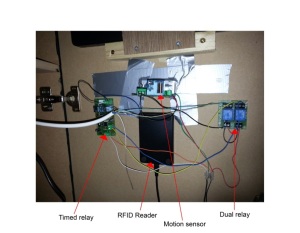
The GPIO is connected to an ultrasonic sensor, which sends out a high pitched audio noise (well above human hearing) and listens for the echo to return. The sensor allows you to increase or decrease the sensitivity, meaning you can set the distance of how far you want it to trigger. It also has a ‘stay open state’ and ‘stay closed state’ feature, so when a person is watching the content the sensor will stay in an open state (as it is still detecting an object in front of it) and once the person steps out of the sensor’s range it will switch to a closed state and the content will finish.
The USB port on the media player is used to connect a USB close range RFID reader. This reader detects the RFID wrist bands that visitors pick up. We’ve also used a directional speaker to limit sound spill in the gallery and to give the visitor a more personal experience. With all these elements combined, the way it works is;
- On the screen the visitor sees a static attractor image
- As the visitor gets closer to the screen, the motion sensor will detect them
- This will trigger the content on the screen to change to an image with instructions asking them to scan their RFID wrist bands on the pink square (the RFID reader is directly behind the pink square)
- This will trigger the content.
If visitors read the instructions and decide they don’t want to view the content they can step away and the sensor will detect there is no one in front of it and switch to the attractor image. If a visitor decides to trigger the video content with the RFID wrist band and decides that they’d rather not watch any more, they can step away and the sensor will detect there is no one there, so the video will end and go back to the attractor image. In the exhibition we have six of these RFID interactives; we’ve named them Character Points.
Concept to Reality Issues
We quickly realised that there was an issue with the triggering. We found that the sensors were not staying in the open state; they would go into a closed state and open state repeatedly which meant the content wasn’t staying on the screen for long. To overcome this we bought a timed relay and wired it in to the sensor. The relay activates when the motion detector senses a person and holds the sensor in an open state – we set the time of this to 10 seconds. The relay gets activated even when it’s holding, meaning it will continuously reset the timer to 10 seconds as long as it’s detecting something. Now when a person steps away from the sensor’s range the content will stay on screen for 10 seconds then switch back to the attractor screen.
Another issue we had was that some visitors decided to poke their fingers through the holes that the sensor’s microphones stick out of. These need to be visible otherwise the sensor will not work (you can see these microphones in the photo of the sensor above). The sensor would get dislodged and fall inside the character point. We tried using glue and silicone to stick these sensors to the door, but visitors still managed to push the sensor through. We found good old gaffer tape held the sensor in place and can withstand a lot of force if someone tries to push the sensor through.
Now that we have the equipment to do this kind of interactivity, we’ll be using it in other interactives. Hopefully in the future we can expand on this to make it in to a long-range RFID system.