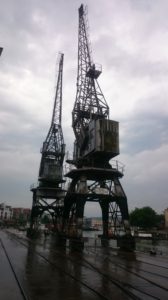
Here at M Shed Bristol, we have some great working exhibits from the bygone era of Bristol Harbour’s industrial past: steam engines, steam boats, steam cranes and more. But the most recognisable and iconic are the four great towering electric cranes standing over 120 feet above the old docks.
As the Industrial Museum was being transformed into the present day M Shed Museum two of the cranes would strike up conversations with each other, entertaining and informing passers-by of what they could look forward to seeing inside the new museum. However due to renovations and movement of the
cranes they fell silent again…
A few years later, due to popular demand I was tasked with bringing the cranes back to life!
To get these cranes talking was going to require rebuilding the whole audio and lighting system and recording new scripts. We were fortunate enough to have Alex Rankin, from our M Shed team, lend his penning abilities for the new scripts and Jacqui and Heather to voice the new crane characters.
To record the dialogu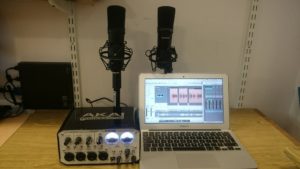 e, we arranged to meet in a nice quite corner of the L Shed store room. It’s a vast store, full of so many objects that there isn’t enough space to have them on permanent display. With both Jacqui and Heather sat at opposite ends of a table, I set up a pair of good quality condenser microphones. Each plugged into their own separate channel on my external sound card, an Akai EIE 4 channel usb sound card with great preamps and phantom powered for the mics. This in turn was hooked up to my MacBook and copy of Logic Pro. I recorded through each script a few times and was able to compile a seamless recording from the various takes. Once finished, I hard panned each channel left and right so that when each voice played back each would have its own speaker, left or right – crane 1 or crane 2.
To start building the new AV system, I searched around the vast L-Shed stores and work rooms to find what was left of the old system. I then decided what could be re used and what new equipment would be needed. I had been informed, by our volunteer team for the working exhibits, that everything had been removed from the cranes themselves; this meant starting from scratch.
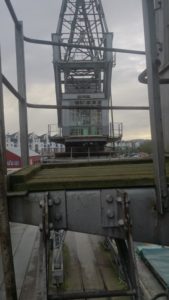
The cranes themselves would need a loud speaker system for the voices and the crane cabs would need different coloured lights to flash in time with the talking as this helps to animate the cranes. That part was relatively easy. It meant scaling the cranes and bolting speakers to their underside and mounting lamps inside the cabs. I’ll be honest, I was helped by the Volunteer team and a huge mobile diesel powered cherry picker!
The hard part was how to feed the power and audio cables to the cranes. After some investigation it turned out that below the surface of the dockside was a network of underground pipes which lead to the base of each crane to feed their power. The great volunteer team once again worked miracles and fed over 600 combined meters of audio and lighting cables for me. This all led back to the clean room in their ground floor workshop. With all the cabling done I just needed to build a lighting control and audio playback system.
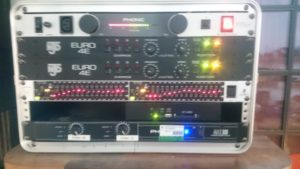
My design solution, using what kit I could find and a few new bits, was to use a solid state compact flash media player, graphic equaliser, audio mixing desk and power amplifier for the audio. To have the light flash in time with the dialogue, I used a two light controller with a light to sound module, similar to what a DJ might use to have their disco lights flash to the music!
By having the audio go through the mixing desk, I was able to take an audio feed for each channel and direct them to lighting controllers. By recording the two voices in stereo, with each voice on its own left or right channel, it meant i only needed one media player and could easily control each channel on the sound desk. The graphic equaliser allowed me to tweak the speakers to acoustically fit their environment.
I looked at randomising the audio or having it triggered by people walking past, but with the amount of people who pass outside M Shed the cranes would be chatting away, non-stop all day! I decided to create a long audio file of about 3 hours with the different recorded scripts and random intervals of silence. These ranged from 5 minutes to 20 minutes, so it always comes as a surprise when they start talking to each other.
The results are really effective. It is always fun to see people being caught by surprise as the cranes light up and start a conversation and to see them stop and listen in on what they have to say.